Strony

środa, 29 grudnia 2010

Convert image to vmdk

Edit: 2011-04-08

Konwersja starych obrazów Kamikadze z formatu image do vmdk pod Windowsem.

Pobieramy obraz OpenWrt na platformę x86 w formacie image:

http://downloads.openwrt.org/kamikaze/8.09.2/x86/openwrt-x86-ext2.image


Do konwersji używamy VirtualBox:

VBoxManage convertfromraw --format VMDK filename.image outputfile.vmdk

przykład:
C:\Program Files\Oracle\VirtualBox>VBoxManage.exe convertfromraw --format VMDK openwrt-x86-ext2.image openwrt-x86-ext2.vmdk
Converting from raw image file="openwrt-x86-ext2.image" to file="openwrt-x86-ext
2.vmdk"...
Creating dynamic image with size 55008768 bytes (53MB)...

Do przeprowadzenia konwersji wystarczą 3 pliki, i ominiemy instalację całego VirtualBox:
  • VBoxManage.exe
  • VBoxDDU.dll
  • VBoxRT.dll

Źródła:
http://wiki.openwrt.org/doc/howto/virtualbox

wtorek, 21 grudnia 2010

TL-WR1043ND OpenWRT DD-WRT ORIGINAL FIRMWARE

Update: 2012-12-05

Ten artykuł przeczytało już ponad 3000 osób !!! :)

Wgrywanie firmware do routera TL-WR1043ND

Spis treści:
  1. ORIGINAL FIRMWARE -> OpenWRT
  2. ORIGINAL FIRMWARE -> DD-WRT
  3. DD-WRT -> ORIGINAL FIRMWARE
  4. OpenWRT -> ORIGINAL FIRMWARE
  5. FIRMWARE UPGRADE

1. ORIGINAL FIRMWARE -> OpenWRT

Aby wgrać inny firmware niż oryginalny należy użyć obrazów, które zawierają "factory" w nazwie.

Osobiście używam obrazów wyprodukowanych przez Cezarego

FACTORY

http://ecco.selfip.net/backfire/openwrt-ar71xx-tl-wr1043nd-v1-squashfs-factory.bin

Do upgrad'u już wgranego alternatywnego firmware używamy "sysupgrade"

UPGRADE
http://ecco.selfip.net/backfire/openwrt-ar71xx-tl-wr1043nd-v1-squashfs-sysupgrade.bin

WAŻNE:
Zdarzyło mi się po ściągnięciu obrazu zmienić jego nazwę dodając datę z "-": taki obraz nie zadziała.

Firmware openwrt-ar71xx-tl-wr1043nd-v1-squashfs-factory.bin wgrywamy przez interfejs web w tradycyjny sposób.

Po minucie: telnet 192.168.1.1 ... passwd ... reboot i mamy OpenWRT na pokładzie (Uwaga: Bez Interfejsu Web !!!)

2. ORIGINAL FIRMWARE -> DD-WRT

Sprawa wygląda podobnie jw.

Użyłem najnowszych obrazów z Sambą.

FACTORY
http://dd-wrt.com/dd-wrtv2/downloads/others/eko/BrainSlayer-V24-preSP2/12-18-10-r15940/tplink_tl-wr1043nd/factory-to-ddwrt.bin

UPGRADE
http://dd-wrt.com/dd-wrtv2/downloads/others/eko/BrainSlayer-V24-preSP2/12-18-10-r15940/tplink_tl-wr1043nd/tl-wr1043nd-webflash.bin

Firmware factory wgrywamy przez weba na oryginalny firmware TP-Linka

3. DD-WRT -> ORIGINAL FIRMWARE

Skorzystałem ze strony Samiux's Blog:
http://samiux.blogspot.com/2010/03/howto-dd-wrt-on-tp-link-tl-wr1043nd.html

Który udostępnił oryginalny firmware tplink.bin:
http://depositfiles.com/en/files/orv90dbqt

Z uwagi na to, że pod DD-WRT /proc/mtd wygląda następująco:
root@tplink:~# cat /proc/mtd
dev: size erasesize name
mtd0: 00020000 00010000 "RedBoot"
mtd1: 007c0000 00010000 "linux"
mtd2: 00630000 00010000 "rootfs"
mtd3: 00050000 00010000 "ddwrt"
mtd4: 00010000 00010000 "nvram"
mtd5: 00010000 00010000 "FIS directory"
mtd6: 00010000 00010000 "board_config"
mtd7: 00800000 00010000 "fullflash"
Użyjemy następującej komendy (tplink.bin wrzucony na pendrive i zamontowany do /mnt):
mtd -e linux -r write /mnt/tplink.bin linux
root@tplink:~# mtd -e linux -r write /mnt/tplink.bin linux
Unlocking linux ...
Erasing linux ...
Writing from /mnt/tplink.bin to linux ...
Unlocking firmware ...
Rebooting ...

Po paru minutach logujemy się do interfejsu web http://192.168.1.1
login:admin
password:admin
Można użyć aktualnego obrazu ze strony producenta:
http://www.tp-link.com/support/download.asp?a=1&m=TL-WR1043ND
wr1043nv1_en_3_12_2_up(100820).bin

Ale nie testowałem tego obrazu więc robisz to na własną odpowiedzialność.

4. OpenWRT -> ORIGINAL FIRMWARE

Podobnie jak w przypadku DD-WRT użyty został ten sam firmware:
http://samiux.blogspot.com/2010/03/howto-dd-wrt-on-tp-link-tl-wr1043nd.html

lecz mtd ma inną budowę:
root@tplink:~# cat /proc/mtd
dev: size erasesize name
mtd0: 00020000 00010000 "u-boot"
mtd1: 00140000 00010000 "kernel"
mtd2: 00690000 00010000 "rootfs"
mtd3: 003d0000 00010000 "rootfs_data"
mtd4: 00010000 00010000 "art"
mtd5: 007d0000 00010000 "firmware"
Pendrive podmontowany do katalogu /mnt

mtd -e firmware -r write /mnt/tplink.bin firmware

root@tplink:~# mtd -e firmware -r write /mnt/tplink.bin firmware
Unlocking firmware ...
Erasing firmware ...
Writing from /mnt/tplink.bin to firmware ...
Rebooting ...
 Update: 2011-06-08
Lub:
http://ecco.selfip.net/tl-wr1043nd-luci/wr1043nd_3_9_13.orig.bin.zip
po rozpakowaniu wgrać przez www

5. FIRMWARE UPGRADE

Ściągamy aktualny firmware ze strony producenta:
http://www.tp-link.com/support/download.asp?a=1&m=TL-WR1043ND
wr1043nv1_en_3_12_2_up(100820).bin

Wgrywamy go przez weba.

------------------------------
Update: 2011-03-09
Jeśli nie ma "weba" jak jak w obrazach od Cezaego (eko.one.pl)
używany sysupgrade
sysupgrade -n /tmp/openwrt-ar71xx-tl-wr1043nd-v1-squashfs-sysupgrade.bin
------------------------------

To tyczy się wszystkich firmware (OpenWRT, DD-WRT i innych) warunek:
Można upgrade'ować tylko taki firmware jaki mamy wgrany na routerze.

Wszystko.

Źródła:
http://samiux.blogspot.com/2010/03/howto-dd-wrt-on-tp-link-tl-wr1043nd.html
http://eko.one.pl

czwartek, 7 października 2010

upgrade vm from 3.5 to 4.0

  1. Record the current IP configuration of the guest operating system. You'll end up needing to recreate it.
  2. Upgrade VMware Tools in the guest operating system. You can do this by right-clicking on the virtual machine and selecting Guest > Install/Upgrade VMware Tools. When prompted, choose to perform an automatic tools upgrade. When the VMware Tools upgrade is complete, the virtual machine will reboot.
  3. After the guest operating system reboots and is back up again, shutdown the guest operating system. You can do this by right-clicking on the virtual machine and selecting Power > Shutdown Guest.
  4. Upgrade the virtual machine hardware by right-clicking the virtual machine and selecting Upgrade Virtual Hardware.
  5. In the virtual machine properties, add a new network adapter of the type VMXNET3 and attach it to the same port group/dvPort group as the first network adapter.
  6. Remove the first/original network adapter.
  7. Add a new virtual hard disk to the virtual machine. Be sure to attach it to SCSI node 1:x; this will add a second SCSI adapter to the virtual machine. The size of the virtual hard disk is irrelevant.
  8. Change the type of the newly-added second SCSI adapter to VMware Paravirtual.
  9. Click OK to commit the changes you've made to the virtual machine.
  10. Power on the virtual machine. When the guest operating system is fully booted, log in and recreate the network configuration you recorded for the guest back in step 1. Windows may report an error that the network configuration is already used by a different adapter, but proceed anyway. Once you've finished, shut down the guest operating system again.
  11. Edit the virtual machine to remove the second hard disk you just added.
  12. While still in the virtual machine properties, change the type of the original SCSI controller to VMware Paravirtual (NOTE: See update below.)
  13. Power on the virtual machine. When the guest operating system is fully booted up, log in.
  14. Create a new system environment variable named
    DEVMGR_SHOW_NONPRESENT_DEVICES and set the value to 1.
    Set devmgr_show_nonpresent_devices=1start devmgmt.msc

  15. Launch Device Manager and from the View menu select Show Hidden Devices.
  16. Remove the drivers for the old network adapter and old SCSI adapter. Close Device Manager and you're done!

piątek, 19 marca 2010

UAC w Windows Server 2008

Co dzień człowiek uczy się czegoś nowego...
W Windows Server 2008 działa UAC
Chcąc wprowadzić zmiany w pliku konfiguracyjnym programu zainstalowanego w katalogu Program Files, nie wystarczy zalogować się z uprawnieniami admina lokalnego, należy dodatkowo uruchomić narzędzie edytujące (w tym przypadku notatnik) na uprawnieniach administracyjnych.
Dzięki temu bez problemu zapiszemy edytowany plik.

piątek, 5 marca 2010

czwartek, 25 lutego 2010

Konfiguracja interfejsów seieciowych za pomocą CMD

Tak się zdarzyło, że dostałem szybkie zadanie w pracy.
Update wszystkich templatów na środowisku VMware...

Wszystkie maszyny korzystają z jednego statycznego ip i mogą być odpalone jedna na raz.
Szybki skrypt konfigurujący interfejs sieciowy.

Przykład
netsh interface set interface "Local Area Connection" DISABLED
netsh interface ip set address name = "Local Area Connection" source = static addr = 192.168.1.2 mask = 255.255.255.0 gateway = 192.168.1.1 gwmetric = 1
netsh interface ip set dns name = "Local Area Connection" source = static addr = 192.168.1.1
netsh interface ip add dns name = "Local Area Connection" addr = 192.168.1.3
netsh interface set interface "Local Area Connection" ENABLED

poniedziałek, 8 lutego 2010

Google Sync: Setting Up Your Windows Mobile Phone

To set up Google Sync on your Windows Mobile device, please follow the steps below.

Important Note: Make sure that you have backed up any Contacts and Calendars from your phone to your computer before proceeding.

Getting Started

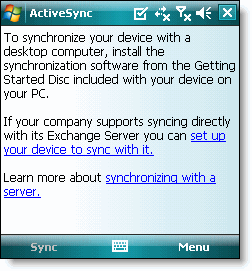
1. Open the Active Sync application on your device's home screen.
2. Click Set up your device to sync with it.
3. Enter m.google.com as the server address.
4. Ensure that the SSL option is selected.


Sign In to Your Google Account

5. Click Next.
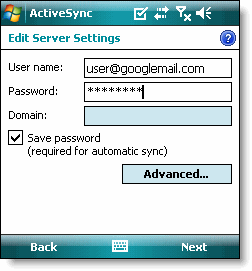
6. Enter your full Google Account email address as the User name.
7. Enter your Google Account password as the Password.
8. Leave the Domain field empty. If your device requires you to enter a domain name, enter google.
9. Click Next.
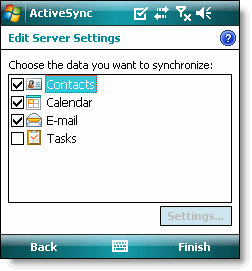
10. Check Contacts, Calendar, or Email, depending on which you'd like to sync. (Tasks is not supported and will lead to an error if checked.)
11. Click Finish.


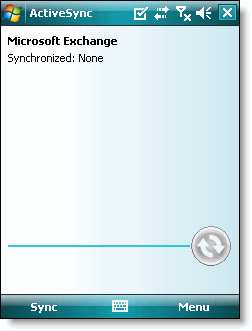
12. Press the Sync softkey on the left to synchronize.


You've now set up Google Sync for your Windows Mobile device.

źródło: http://www.google.com/support/mobile/bin/answer.py?answer=138636&topic=14299